Datos al agendar (booking details) decides what the patient is asked for in each appointment, what’s required and what each detail is called at your organization. The same rules apply to every appointment: those your team books, those booked by Arbol’s WhatsApp assistant and those that come from other systems. Set it up when you start and whenever the details your organization requires change.
Before you start
- You need the Administración role.
- To add Campos propios (your own fields), first turn that feature on in Configuración › Institución y funciones (see Set up Agenda).
Steps
-
In Configuración, click Datos al agendar.
-
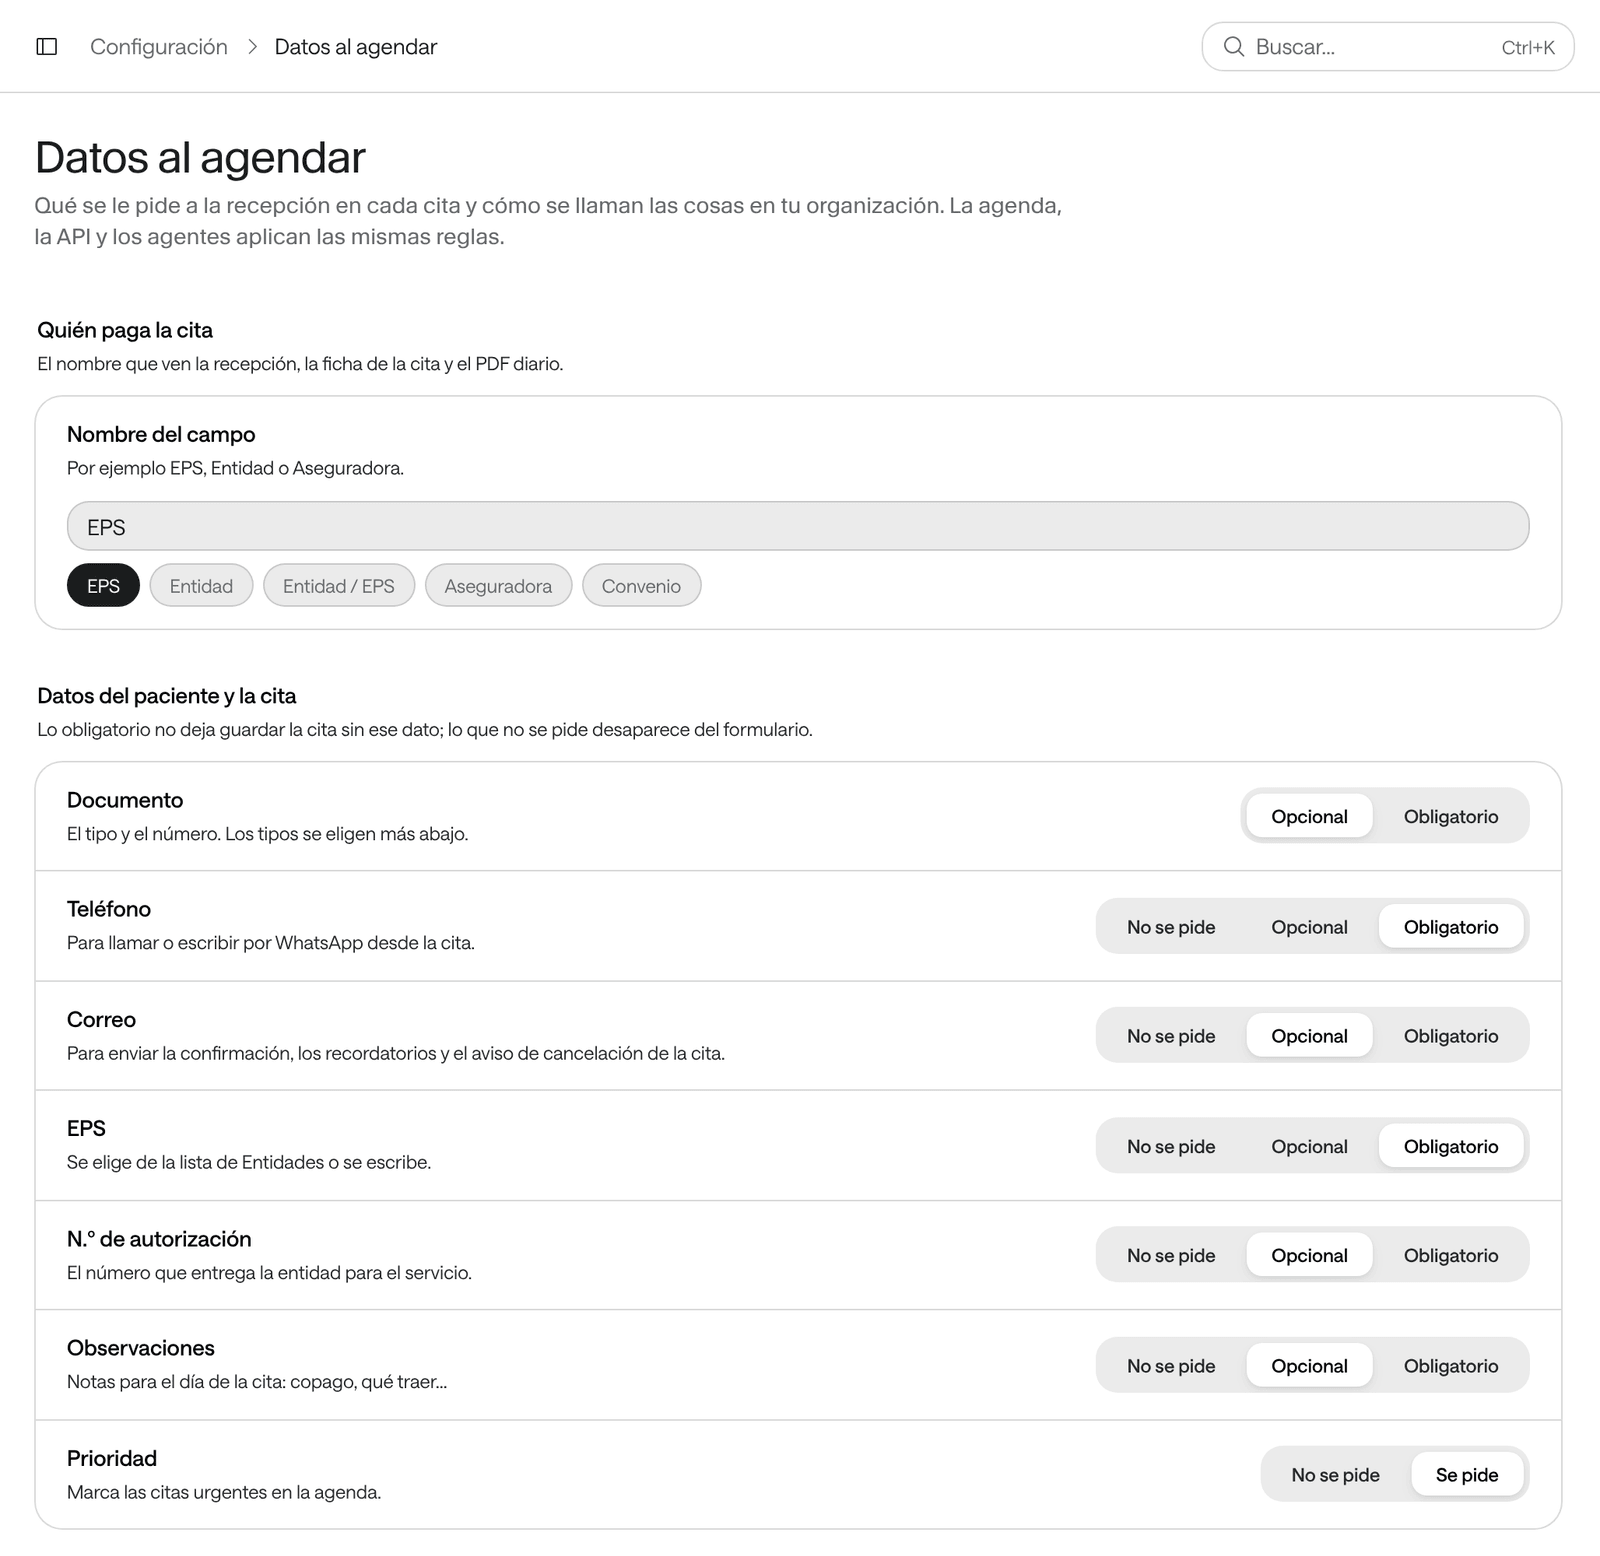
Under Quién paga la cita (who pays for the appointment), type the Nombre del campo (field name) or choose one: EPS, Entidad, Entidad / EPS, Aseguradora (insurer) or Convenio (agreement). The front desk, the appointment panel and the daily agenda PDF show that name, and it’s the name of the payer list in Configuración.
-
Under Datos del paciente y la cita (patient and appointment details), choose for each detail whether it’s No se pide (not asked), Opcional (optional) or Obligatorio (required):
Detail What it’s for Options Documento (ID document) The patient’s document type and number. Opcional or Obligatorio: it’s always asked. Teléfono (phone) To call or message on WhatsApp from the appointment, and for WhatsApp and call reminders. No se pide, Opcional or Obligatorio Correo (email) To send the confirmation, the reminders and the notices by email. No se pide, Opcional or Obligatorio Entidad / EPS (or the name you gave it) Who pays. It’s chosen from the payer list or typed. No se pide, Opcional or Obligatorio N.º de autorización (authorization number) The number the payer issues for the service. No se pide, Opcional or Obligatorio Observaciones (notes) Notes for the day of the appointment: copayment, what to bring… No se pide, Opcional or Obligatorio Prioridad (priority) Marks urgent appointments in the agenda. No se pide or Se pide (asked) The Nombre del paciente (patient name) is always required.
-
Under Duración de la cita (appointment duration), turn on Cambiar la duración al agendar (change the duration when booking) if the front desk may shorten or lengthen an appointment when booking or rescheduling it. Only that appointment changes: the service keeps its duration. If you turn it on, under Duraciones permitidas (allowed durations) type the Mínimo (min) and Máximo (min), and choose in De a (in steps of) how many minutes each step is (with 5 min, 17 isn’t allowed and 15 is).
-
If you want to change what a detail is called, open Personalizar textos (opcional) (customize texts) and type the Nombre en el formulario (name in the form) and the Ejemplo dentro del campo (example inside the field), the gray text shown before typing. Empty goes back to Agenda’s own.
-
Check the Tipos de documento (document types) and, if your organization uses them, the Campos propios (see below).
-
At the bottom, click Guardar cambios (save changes).
What you see when you’re done
At the bottom it says Guardado. Las próximas citas ya piden estos datos. (saved, the next appointments now ask for these details). Appointments already saved don’t change.
When booking, each required detail has an * and the appointment can’t be saved without it. The phone, the payer and the authorization show whenever they’re asked. The optional email and notes, and optional custom fields, sit inside Más datos (opcional) (more details), which starts closed. What’s No se pide disappears from the form.
In Configuración, the Datos al agendar status line says how many details are required besides the name.
Document types
The list comes with Colombia’s documents: cédula de ciudadanía (CC), tarjeta de identidad (TI), registro civil (RC), cédula de extranjería (CE), passport (PA), the migrant permits (PEP, PPT) and others. The first active one is the Predeterminado (default): the one picked automatically when booking.
- To make another one the default, click Usar por defecto (use as default, the up arrow) on its row.
- To stop offering one, turn its switch off. It’s kept for patients who already have it. At least one always stays active.
- To change its name or description, click the pencil.
To add one, such as another country’s ID:
-
Under Tipos de documento, click Agregar tipo (add type).
-
Type the Código (code), 1 to 10 letters or numbers with no spaces, such as «DNI». It’s what shows next to the number and can’t be changed later.
-
Type the Nombre (name) and, if you like, the Descripción (opcional) (description), shown when hovering over the type.
-
Click Agregar a la lista (add to the list) and then, at the bottom of the page, Guardar cambios.
Up to 40 document types fit.
Your own fields
These are the details your organization needs that aren’t above, such as the medical order number, the referring site or the companion. They’re asked in every appointment.
-
Under Campos propios, click Agregar campo (add field).
-
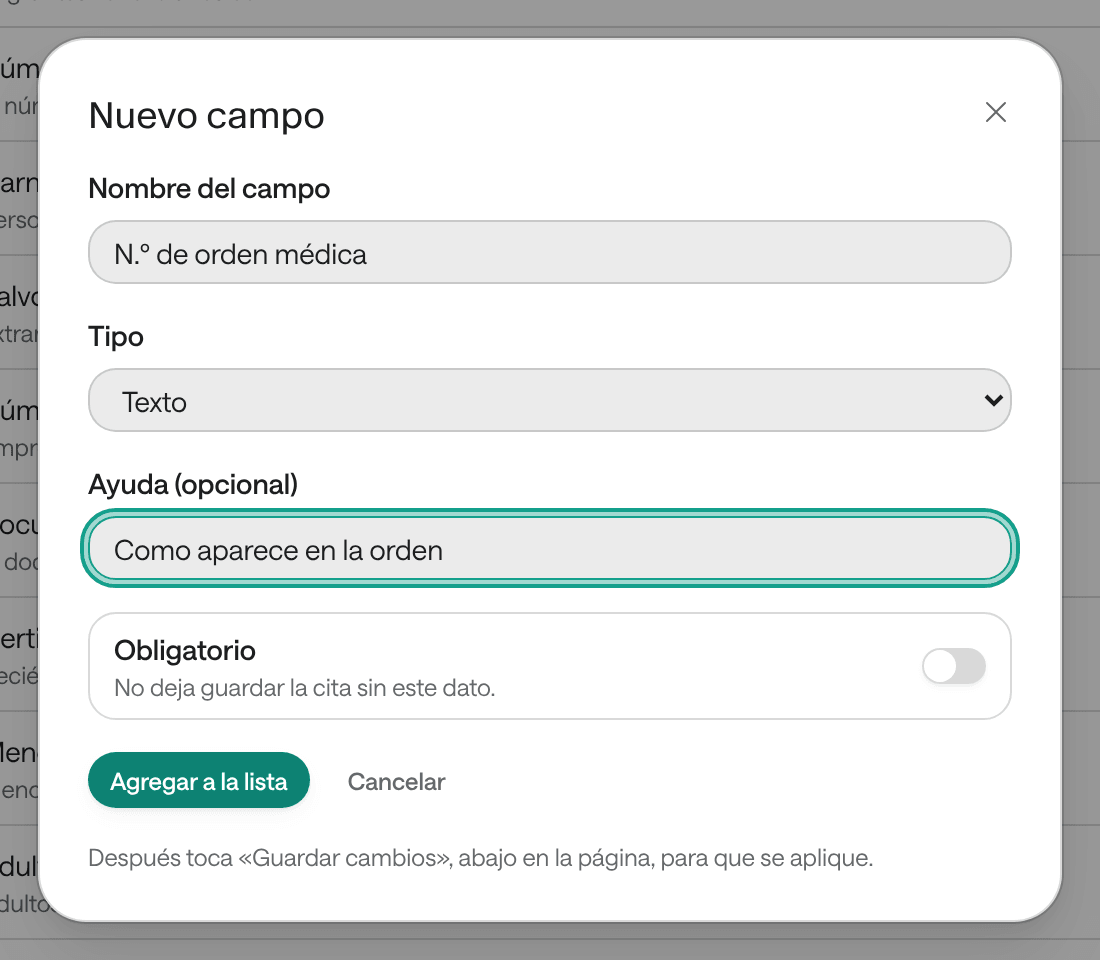
Type the Nombre del campo (field name), for example «N.º de orden médica» (medical order number).
-
Choose the Tipo (type): Texto (text), Número (number), Fecha (date), Sí / no (yes / no) or Lista de opciones (list of options). For a list, type the Opciones (options), one per line (up to 50). The type can’t be changed later, because saved appointments use it.
-
If you like, type an Ayuda (opcional) (help) for whoever books, such as «Como aparece en la orden» (as it appears on the order).
-
Turn on Obligatorio if the appointment can’t be saved without this detail.
-
Click Agregar a la lista and then, at the bottom of the page, Guardar cambios.
The field shows when booking, in the appointment panel under Cita, and in Editar datos de la cita (edit appointment details). Up to 30 custom fields fit.
To stop asking for one, click the archive button on its row: it’s marked Archivado (archived) and what’s already saved on appointments is kept. To ask for it again, click the circular arrow on its row.
Checks before booking
What the front desk must check before confirming an appointment, such as «La orden médica está vigente» (the medical order is valid), isn’t set up here: it belongs to each service, under Antes de agendar (before booking). See Create and set up services.
Common problems
When booking it says «Revisa los campos requeridos para agendar esta cita»
A detail your organization set to Obligatorio is missing (“check the required fields to book this appointment”). When booking it’s marked with *.
What to do: fill in the detail and confirm the appointment again. If that detail shouldn’t be required, change it here.
I don't see Campos propios
The Campos propios feature is off.
What to do: turn it on in Configuración › Institución y funciones and go back to Datos al agendar.
I can't turn off a document type
It’s the only active one, and at least one must always stay active.
What to do: turn another type on before turning that one off.
It says «El código lleva de 1 a 10 letras o números, sin espacios» or «Ya hay un tipo con ese código»
The code has spaces or symbols (“the code takes 1 to 10 letters or numbers, no spaces”), or it already exists in the list (“there’s already a type with that code”).
What to do: type another code, using only letters and numbers. If the type already exists but is off, turn it on.
It says «Las duraciones van de 1 minuto a 24 horas, y la mínima no puede pasar de la máxima»
The Mínimo (min) is greater than the Máximo (min), or one goes beyond 24 hours (1,440 minutes).
What to do: fix both values and save again.
I made a detail Obligatorio and earlier appointments don't have it
Changes apply to appointments booked from when you save.
What to do: if you need the detail on an earlier appointment, open it and add it with ⋯ › Editar datos de la cita.
When saving it says «La disponibilidad o el registro cambió. Actualiza y vuelve a intentarlo»
Someone else saved Datos al agendar while you had it open.
What to do: reload the page, check what changed and make your changes again.