Before the team can book, someone with Administración prepares Agenda: who provides care, when, and which services they offer. This section is for that person. If you only book, you don’t need it.
Before you start
- You need the Administración role. With it you see Configuración (settings) at the bottom of the menu.
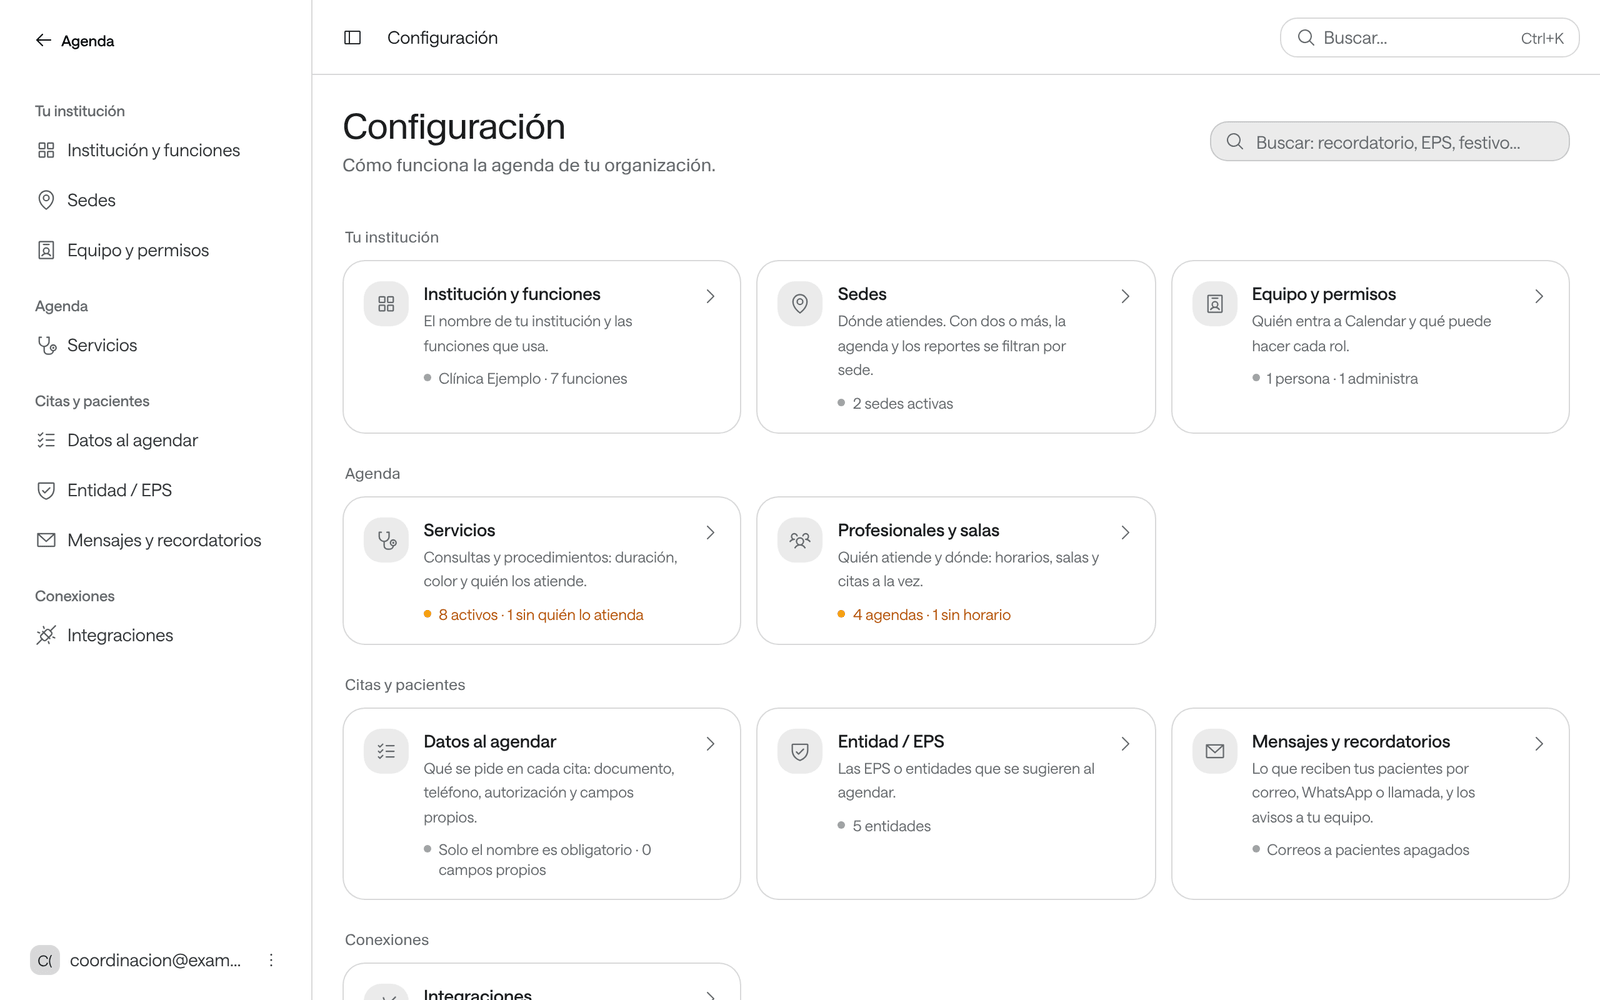
In what order to set it up
-
Institución y funciones (organization and features): your organization’s name and logo, and the features it uses. See below.
-
Sedes (sites), if you provide care in more than one place. See below.
-
Profesionales y salas (professionals and rooms; in the menu, Personas y salas): who provides care and where. See Add professionals, rooms and equipment.
-
Horario (hours), on each agenda’s page: when each one works, with special days and absences. See Set up hours, special days and absences.
-
Services: what gets booked, how long it lasts and who provides it. See Create and set up services.
-
Datos al agendar (booking details) and Entidades (payers): what the patient is asked for in each appointment. See below, Set up booking details and Set up payers.
-
Mensajes y recordatorios (messages and reminders): what patients receive. See below and Set up messages and reminders.
-
Equipo y permisos (team and permissions): invite your team with their role. See Who can do what.
The Configuración page shows a status line in each section, for example how many agendas have no hours or how many services have nobody providing them. Check it when something can’t be booked.
Institución y funciones
-
In Configuración, click Institución y funciones.
-
In Nombre (name), type your organization’s name. It appears at the top of the menu and is the sender of the emails to patients.
-
In Logo de la institución (organization logo), upload your logo (PNG, JPG or WebP up to 1 MB). It heads the emails, the appointment slip and the agenda PDF. It’s saved as soon as you upload it.
-
Under Funciones (features), turn on what your organization uses:
Feature What it adds Lista de espera The waiting list in the menu. Reportes The reports in the menu. Sedes Sites in Configuración, and the filter by site when there are two or more. Salas y equipos Offices, rooms and equipment as agendas, and services that also need a room or piece of equipment. Campos propios Your organization’s own fields in Datos al agendar, such as an order number. Documentos y autorizaciones Files attached to the patient and to each appointment. Mensajes y recordatorios Emails, WhatsApp messages and calls to patients, and the daily agenda PDF. -
Click Guardar cambios (save changes).
Turning a feature off hides it but deletes nothing. Turning Mensajes y recordatorios off stops all messages to patients.
Sedes
If your organization works in a single place, you don’t need sites. With two or more, the agenda, Agendar, Personas y salas and the reports can be filtered by site.
-
In Configuración, click Sedes and then Nueva sede (new site). If you don’t see Sedes, turn it on first in Institución y funciones.
-
Type the site’s Nombre, Ciudad (city), Dirección (address) and Teléfono (phone), and check its Zona horaria (time zone). The address and phone appear on the printed appointment slip.
-
Click Crear sede (create site).
-
On the site’s page, under Agregar agendas (add agendas), find the professionals, rooms and equipment that work there and click Agregar (add).
Agendas without a site work at all of them. An Inactiva (inactive) site disappears from the filters; its agendas keep working.
Datos al agendar
Decide what the patient is asked for in each appointment and what each field is called at your organization.
-
In Configuración, click Datos al agendar.
-
Under Datos del paciente y la cita (patient and appointment details), choose for each field whether it’s No se pide (not asked), Opcional (optional) or Obligatorio (required): document, phone, email, payer, authorization and notes. A required field won’t let the appointment be saved without it; a field that isn’t asked disappears from the form. Prioridad (marking an appointment as urgent) is either asked or not.
-
Under Quién paga la cita (who pays for the appointment), change the Nombre del campo (field name) if your organization doesn’t say «Entidad / EPS», for example «Aseguradora» (insurer).
-
If you like, adjust the Tipos de documento (document types), change each field’s name and example in Personalizar textos (opcional) and, if you turned on Campos propios, add them with Agregar campo (add field). Under Duración de la cita (appointment duration), turn on Cambiar la duración al agendar (change the duration when booking) so the front desk can shorten or lengthen an appointment.
-
Click Guardar cambios.
If the email is set to No se pide, patients don’t receive emails.
Every option, step by step: Set up booking details.
Entidades
This is the list of payers (EPS, insurers or other entities) suggested when booking. In the Configuración menu it appears under the name you gave it in Datos al agendar.
-
In Configuración, click Entidades (or your organization’s name for them).
-
Click Agregar (add), type the Nombre and, if you like, its billing Código (code). To load many at once, use Pegar lista (paste list): one per line.
-
Click Guardar (save).
If a payer needs the doctor to be consulted first, turn on Solo agenda el equipo (only the team books): Arbol’s WhatsApp assistant then doesn’t book its patients, but leaves them on the waiting list with Coordinar con el médico (coordinate with the doctor).
Every option, step by step: Set up payers.
Mensajes y recordatorios
If your organization uses Mensajes y recordatorios, this is where you decide what the patient receives, through which channel and when:
- Correo (email): the Confirmación al agendar (booking confirmation), up to three reminders before the appointment, the Aviso de cambio de horario (time change notice) and the Aviso de cancelación (cancellation notice). You can also add the Confirmar asistencia (confirm attendance) and Cancelar la cita (cancel the appointment) buttons to the email: they open a page with the appointment, nothing changes until the patient confirms there, and the history shows it as done by the patient.
- WhatsApp y llamadas (WhatsApp and calls): reminders and notices by WhatsApp and by phone call, with Arbol’s Contactabilidad.
- Diseño del correo (email design): how the emails look, with a test.
- Avisos al equipo (notices to the team): the daily agenda PDF by email and the waiting list notices.
Emails only go out when the appointment has the patient’s email. The WhatsApp and calls connection is set up by the Arbol team: if you need it, ask them.
Every option, step by step: Set up messages and reminders. How the team works with it day to day: Reminders and confirmations.
Integraciones
In Configuración › Integraciones (integrations) you see Agenda’s connections to other Arbol services. The Arbol team connects them.