Do this when a patient asks for an appointment, at the desk, on the phone or by message. There are two ways: the Agendar (book) page, which finds the first free slot across all professionals, and a click on a free space on the agenda, when you already know the time and with whom.
Before you start
- You need the Recepción, Profesional or Administración role.
- Have the patient’s document at hand and know what they need (the service). If they have an authorization or a medical order, you can attach it.
Steps
-
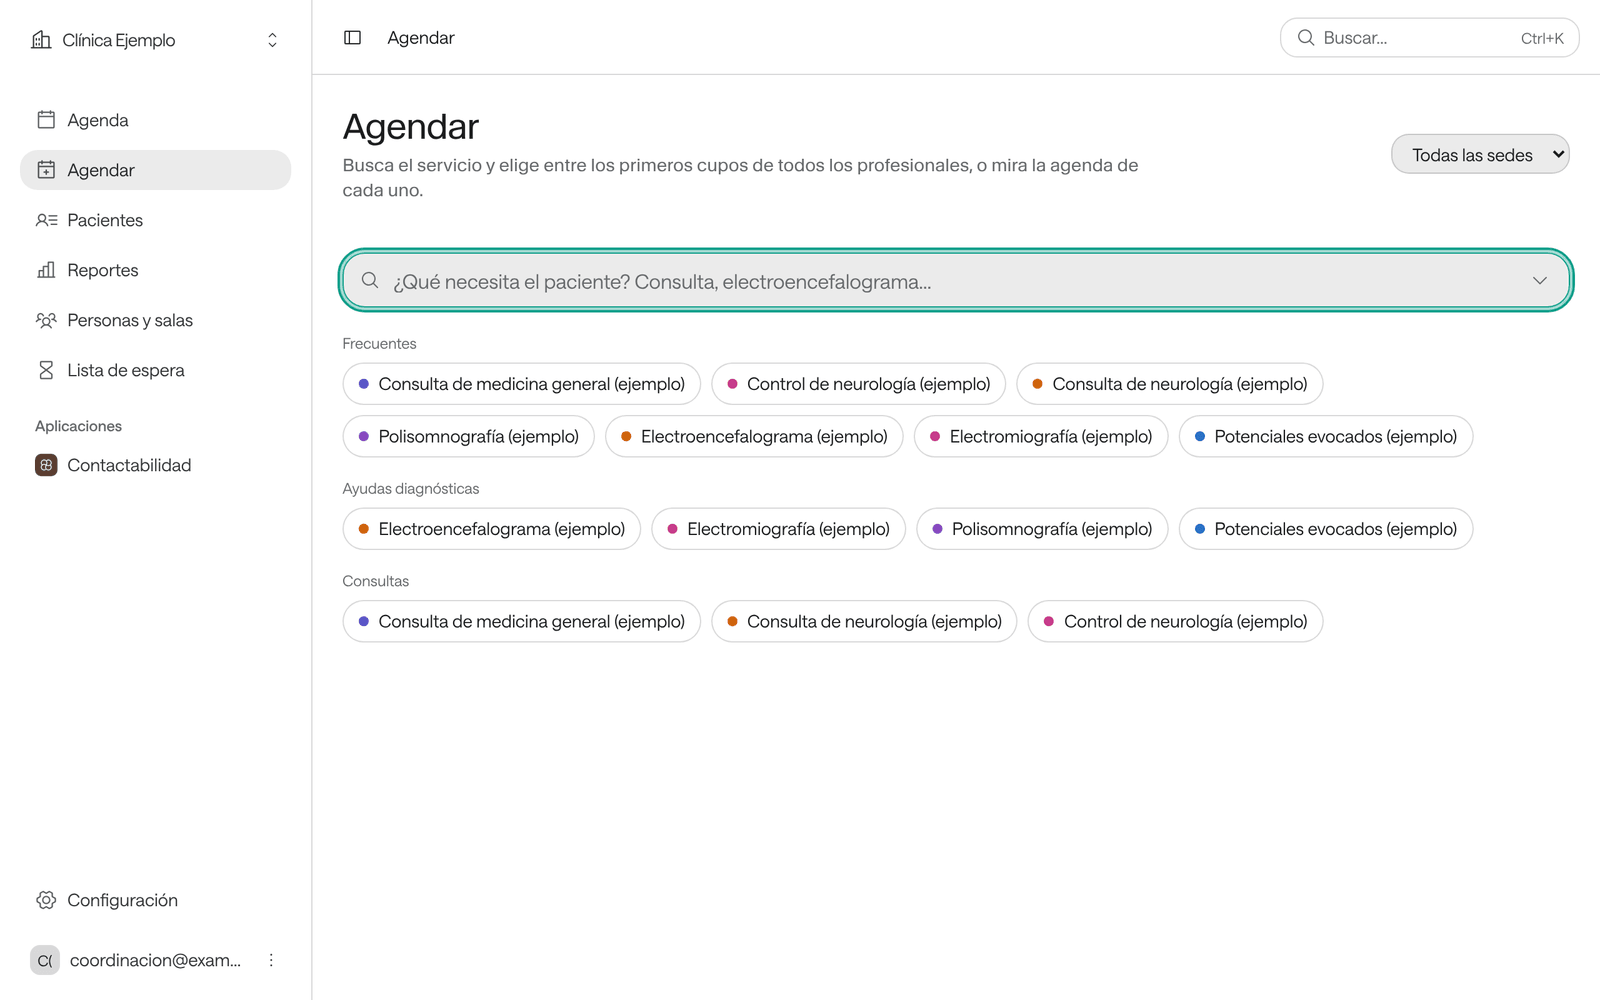
In the menu, click Agendar. On the agenda you can also press N or, on a phone, the round + button.
-
In the ¿Qué necesita el paciente? (what does the patient need?) search box, type the service and pick it from the list. You can also click one under Destacados (featured), Tus recientes (your recent ones), Frecuentes (frequent) or its category.
-
Look at the slots. At the top, Próxima cita disponible (next available appointment) shows how far away it is; below are the first slots of each day.
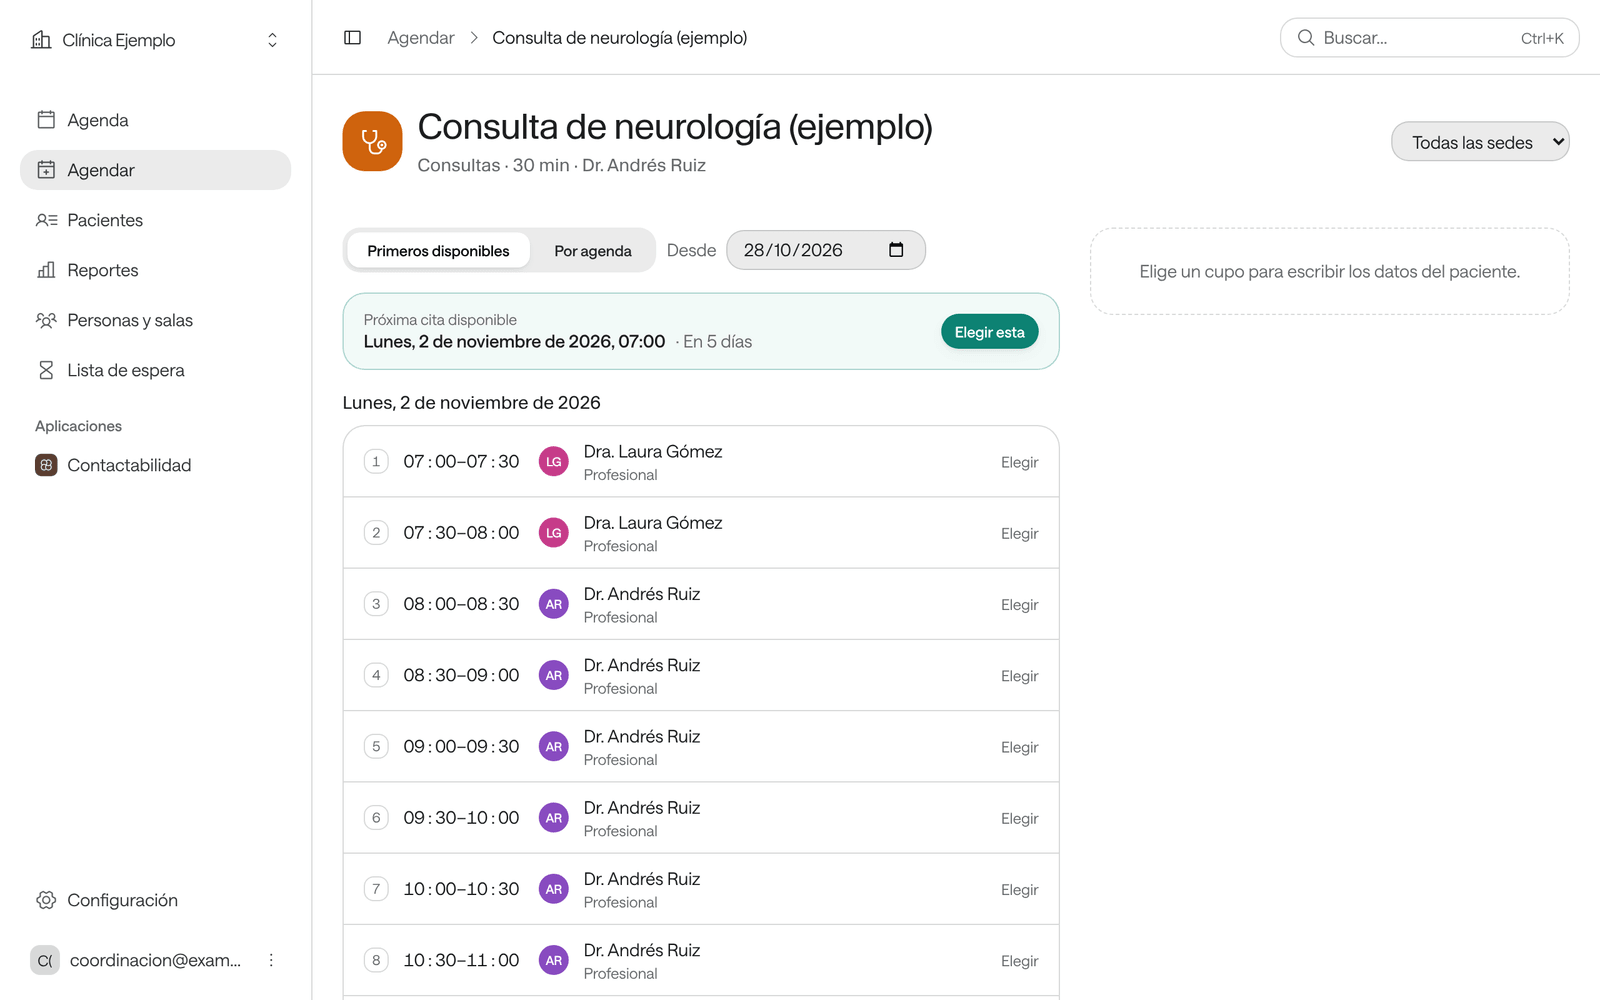
If you need something else, change the controls at the top:
- Primeros disponibles (first available) shows the first slots of all professionals, by day. Por agenda (by agenda) shows each professional’s slots separately.
- In the professionals list, pick one, or Todos los profesionales (all professionals).
- In Desde (from), pick the day to search from.
- In Duración (duration), if your organization allows it, type how long this appointment lasts (for example
20mor1h30). It only changes this appointment.
-
Click the slot the patient wants, or Elegir esta (choose this one) beside the next available appointment. On the keyboard, the keys 1 to 9 pick the first slots.
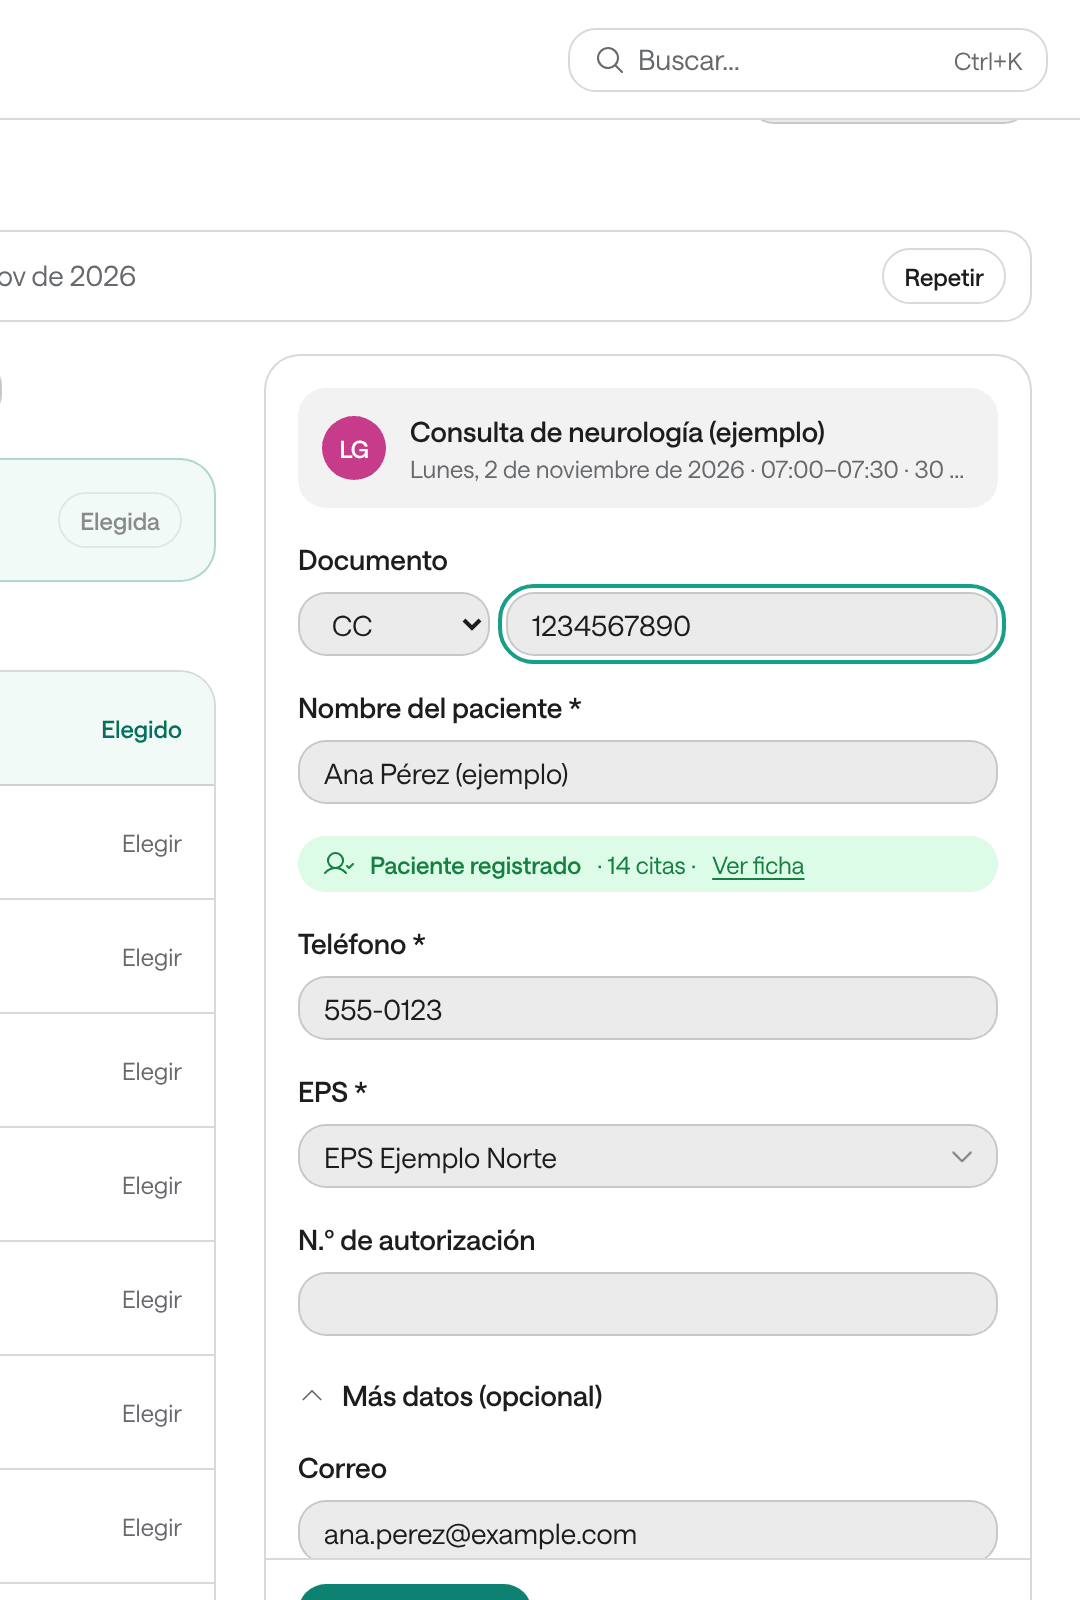
The panel with the chosen slot and the patient’s details opens on the right.
-
Read what the service says, if anything:
- Solo pacientes de 18 a 65 años (patients aged 18 to 65 only), or desde los N años (from age N) or hasta los N años (up to age N): the service has an age range. If Agenda doesn’t know the patient’s date of birth, or they fall outside the range (it warns you in amber), check their age and tick Revisé la edad y autorizo que el equipo agende esta cita (I checked the age and authorize the team to book).
- Nota para quien agenda (note for whoever books): what the team should check. The patient doesn’t see it.
- Indicaciones para el paciente (instructions for the patient): what you should read to them, such as coming in fasting. They also get them by email and in the WhatsApp message you send from Agenda.
-
Type the patient’s document number. If they’re already registered, Agenda fills in their details and shows Paciente registrado (registered patient) with their appointment count and Ver ficha (view record).
If it doesn’t find them, type the name in Nombre del paciente. As you type, Agenda suggests patients with that name; pick one if it’s the same person. If it’s someone new, keep typing: Agenda registers them when you save the appointment.
-
Fill in the rest. Fields marked * are required; your organization decides which ones are asked for and what they’re called. Usually they’re Teléfono (phone), Entidad / EPS (payer) and N.º de autorización (authorization number).
Under Más datos (opcional) (more details, optional) are the email, Urgente (the appointment is highlighted in red and shows among the priority ones), Motivo (reason) and Observaciones (notes).
-
If Antes de agendar (before booking) appears, tick each of the service’s checks, for example that the medical order is still valid. You can’t save without ticking them.
-
If you like, attach the authorization or order in Adjuntar autorización u orden (opcional): Subir archivo (upload file), or Tomar foto (take photo) on a phone. This option appears if your institution uses the Documentos y autorizaciones (documents and authorizations) function. Only PDFs and images (JPG, PNG, WEBP or HEIC) are kept.
-
Click Confirmar cita (confirm appointment), or press Ctrl+Enter.
What you see when you’re done
The panel shows Cita guardada (appointment saved) with the patient, the day and the time. From there:
- Imprimir formato de cita (print appointment slip), if the service asks for it (see Print the appointment slip and the agenda).
- Verla en la agenda (see it on the agenda) opens the appointment on its day.
- Enviar por WhatsApp (send by WhatsApp) opens WhatsApp with a message already written for the patient: the service, the day, the time, with whom and their instructions.
- Agendar otra para este paciente (book another for this patient) goes back to the list of services with the same patient.
Below it, the Indicaciones para el paciente appear again: this is the moment to read them out. If your organization has emails turned on and the appointment has the patient’s email, they get the confirmation.
Another way: click a free space on the agenda
Use it when you already know the time and with whom, for example to fill a gap in the day.
-
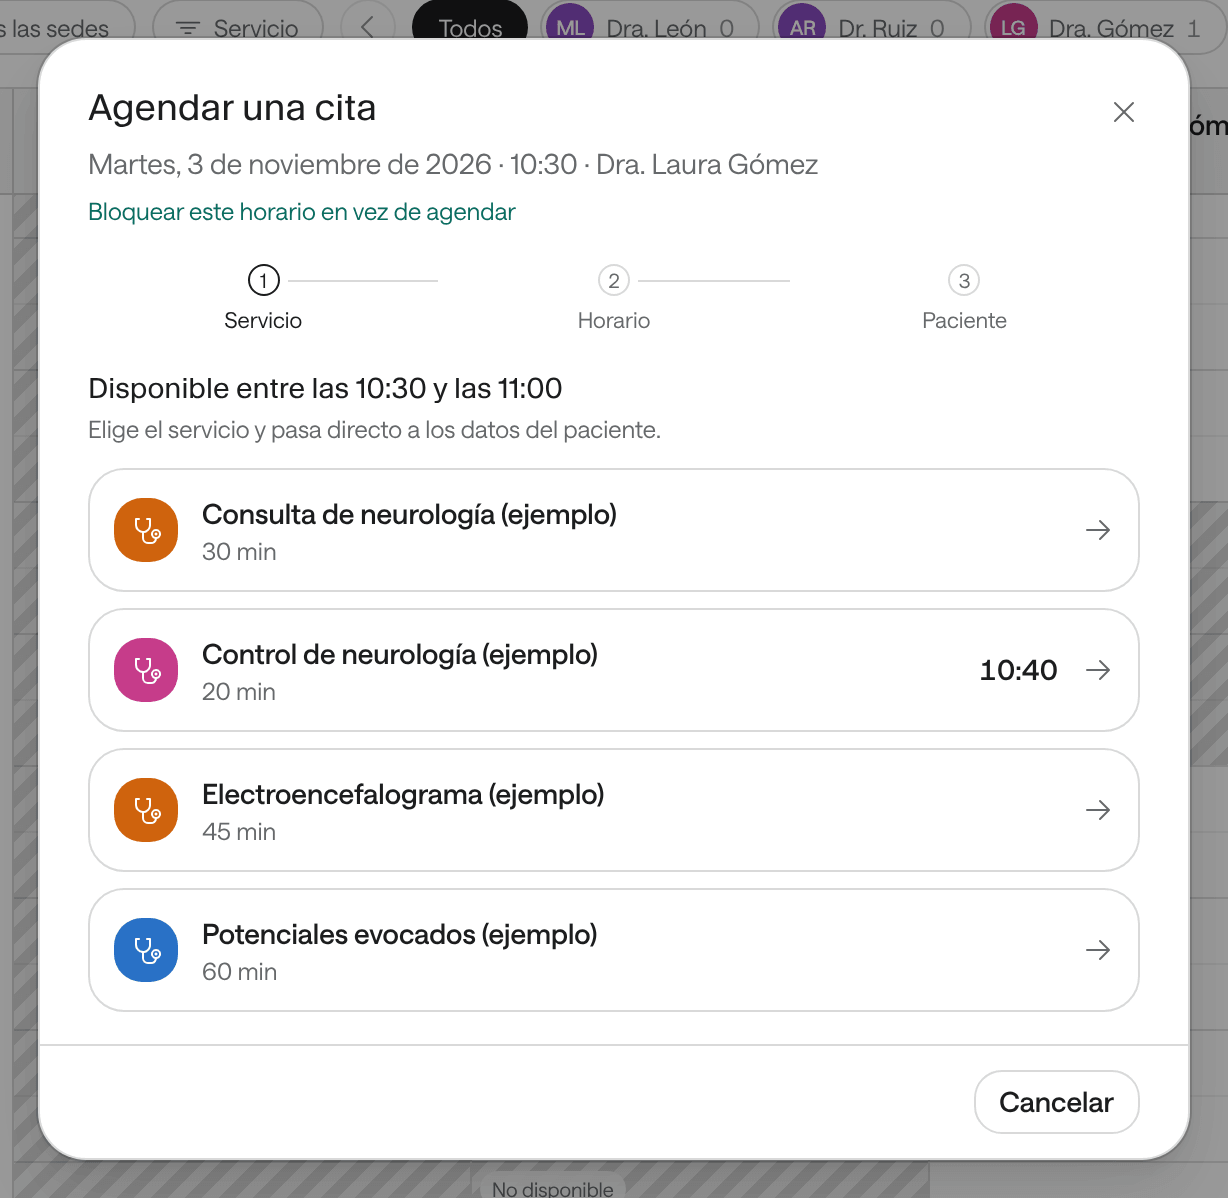
In Agenda, in the Día or Semana view, click the free space, at the time and in the professional’s column.
Agendar una cita (book an appointment) opens with what’s free at that time: Disponible a las 9:30 (available at 9:30), for example.
-
Click the service. You go straight to the patient’s details.
If the service isn’t in the list, open it under Otros servicios de esta agenda (other services of this agenda) or Ver todos los servicios (see all services). Then pick the Día (day) and a time from the list. If the day has no slots, Agenda offers the Próximos cupos (next slots).
-
Enter the patient’s details, the same as in steps 5 to 9 above.
-
Click Confirmar cita.
The agenda shows La cita se guardó correctamente. (the appointment was saved) with Ver cita (view appointment) to open it.
Book for a patient you already know
You can start from the patient instead of the service:
- In their record, click Agendar cita.
- In search (Ctrl+K), under the patient, choose Agendar para este paciente (book for this patient).
- On a seen or cancelled appointment, click Agendar de nuevo (book again) and choose when: Lo antes posible (as soon as possible), En 1 semana (in 1 week), En 1 mes (in 1 month)… If the service has a suggested follow-up, it comes first.
The Agendar page says Agendando para (booking for) and the name. If the patient has had appointments, Última cita (last appointment) appears with Repetir (repeat), which opens the same service with the same agenda.
Add an overbooking
An overbooking (sobrecupo) is an appointment at a time that’s already full or outside the agenda’s hours. It’s added beyond capacity and marked Sobrecupo on the agenda and in the day’s PDF. Recepción, Profesional and Administración can add one, and only from the agenda.
-
In Agenda, click the time you need, in the professional’s column.
-
In Agendar una cita, pick the service. If it’s not among the available ones, open it under Otros servicios de esta agenda.
-
Below the times, in ¿La hora que necesitas está llena? Agrega un sobrecupo (is the time you need full? add an overbooking), check the time and click Agregar sobrecupo.
-
Agenda asks ¿Agregar un sobrecupo?. Click Agregar sobrecupo.
-
Enter the patient’s details and click Confirmar sobrecupo.
You can also add an overbooking at the same time as another appointment: open it, click ⋯ and choose Agregar sobrecupo a esta hora (add overbooking at this time).
A long study whose room or equipment has a slot limit doesn’t accept overbookings: Agenda says «Este estudio tiene un límite de cupos y no admite sobrecupos. Elige un horario disponible.» (this study has a slot limit and doesn’t accept overbookings; pick an available time).
Common problems
It says «No hay cupos hasta el…» (no slots until…). Agenda searched as far ahead as that service can be booked and found no free times. Below, it explains why, for example that the agenda has no hours or has an absence. Try another professional, another date in Desde, or add the patient to the waiting list. If the service should have slots, tell whoever manages the agenda.
You picked a slot and on confirming it says «Ese horario ya no está disponible. Elige otro horario» (that time is no longer available). Someone else booked it while you were typing. Agenda searches again and shows the free slots; the patient’s details are kept. Pick another one and confirm again.
It says «Aún no hay servicios para agendar» (no services to book yet). Nobody has created services, or none has anyone providing it. Ask someone with Administración to set them up (see Set up Agenda).
The service doesn’t show up in the search. It may be inactive, have nobody providing it, or not be offered at the site chosen at the top.
More cases in Common problems.